Monday, April 21, 2008

Portfolio Oil Pastel Tutorial Step 1


Okay, as promised here is my post on how I do my backgrounds using Portfolio Series Oil Pastels. They are so great to use. Remember this technique works so well because the Portfolio Oil Pastels are water soluble.

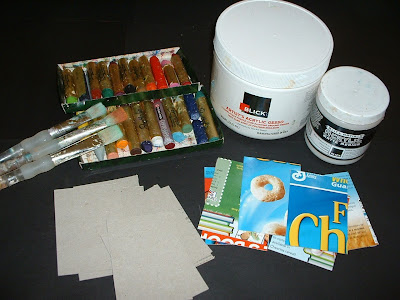
I first start with my blank ATCs that I cut from a cereal box. I always love to use recycled products in my art when I can.

The supplies that I used are included in this photo. Blank ATCs, gesso, acrylic matte medium, paint brush, and of course the pastels. One other tool not shown here that is vital to this project is your finger! Now let's get on with it!

Portfolio Oil Pastel Tutorial Step 2


I paint each ATC (I use the blank side of the cereal box.) with a couple coats of the white gesso. Don't worry about painting in one direction. When you apply the gesso in different directions it will give you interesting lines for your background. Don't worry if your ATCs start to bend and curl; they will be fine once they dry and they will be flat again.

Portfolio Oil Pastel Tutorial Step 3


Using the pastels, scribble two colors of your choice. I like to use two and if I want to add more, I do that later. You don't have to cover the entire ATC.

Portfolio Oil Pastel Tutorial Step 4


This is where you get to use your fingers. Rub the oil pastels into your ATC. It is not important to have the pastels all the way to the edge of the ATC. You will blend them in the next step.

Portfolio Oil Pastel Tutorial Step 5


This next step is where we are going to seal the oil pastels into the ATC blank. Using the matte medium and that finger of yours again, rub the matte medium all around the blank ATC. You will see how it starts to liquefy the oil pastels and how the colors will start to blend.

On the last three in the bottom row, I used gesso instead of the matte medium. Using the gesso will lighten any heavy colors you used and give it more of a pastel or softer look.

When you use the gesso just apply a little dab on your finger and start rubbing and blending it into the ATC.

Portfolio Oil Pastel Tutorial Step 6


I stamped some images randomly onto my backgrounds using various inks. I used Brilliance White and Ranger's Archival Sepia and Black Ink.

Now we have 9 ATCs just waiting to be used!

Are you wondering where the completed ATCs are??

You will find them in the May issue of Altered Arts e-magazine which you can download for free.

Sign up for our new e-magazine. Click here!

You can sign-up (and unsubscribe) on the left-hand side of the page at the site above. You must be on our email list to receive notification of when each e-magazine is published.

Thursday, January 17, 2008

Step-by-Step Packing Tape Transfer That I did


A fun and easy technique to use on your ATCs, Altered Books, or you can use it to make beautiful greeting cards.

I used "Duck" band packing tape for this technique, but you can also use clear, contact paper which will render a larger piece for your image.

The best type of images to use should be laser printed, which most collage sheets are (this image is courtesy of Altered Pages), or you can make your own up. You can also use copies from a magazine, newspaper, or book.

Tear a piece of tape that is larger than your image and place the sticky side up on your work table. Take your image and place the image face down on the sticky side of the tape then burnish well with a spoon or popsicle stick.

Place the piece of tape with the image on it in a dish of warm water and let it soak for a minute or two.

To remove the paper from the tape, gently rub it with your fingers. It should start rolling off in layers depending on how thick it is. Do not rub with your finger nail or you could rub the image off the tape (but then again it could leave a beautiful, cloudy image, it just depends on what you need or want for your project). Let it dry for a couple of minutes and if you see any white spots (that means there is still paper on it), wet your image again and rub some more to remove the last layer of paper.

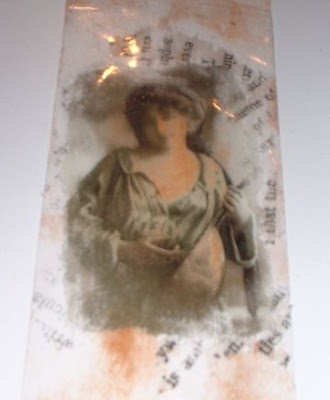
You now have this beautiful transparent image to use. There are now several ways that you can treat this image.


The back of the image will be sticky and my favorite thing to do is to apply some pigment powders to it. Pearl Ex or Powder Pearls can be brushed on or you can use a gold leaf pen, apply sheets of gold leaf, chalks, paints, glitter, glitter glue or anything that you like (did I leave anything out??? :). One other thing to try is to cut your image out before you apply it to the tape (use decorative scissors or tear your image) and then after you have placed your image on the sticky side of the tape, place different papers around your image (also on the sticky side of the tape) like newspaper print, print from a magazine, and other images like flowers to make a collage on the tape and you will end up with this gorgeous piece of artwork. Leave little gaps in the papers and then fill them with the powders, glitter or gold leaf for an interesting effect.

TA DA!!!!!!

Your image is now ready to use!

There are several ways to attach your image to your artwork. I like to use gel medium but you can certainly use a glue stick or double sided tape.

Here are some tips to remember when you are doing this technique:

1.) Make sure the surface that you are working on is free of any tiny particles (especially those tiny little holeless beads; these could leave lumps, bumps or grooves in your tape).

2.) Use a pair of decorative scissors to cut your image out.

3.) If your image is wider than your tape, you can place pieces of tape next to one another (so long as it overlaps a tiny bit). This seam will not show too much and will give it some depth and texture.

4.) If you get a wrinkle in your tape that is fine...burnish it well, that tiny line will not show too much.

Okay, you now know how to do it and we would LOVE to see your end results! Please post to the comments section with a link to your site, blog, or picture trail site and share your creation with us!

Wednesday, January 16, 2008

Results of Designers' ATC Challenge

Well ,below are my pieces for the designers' challenge I had previously posted information about. These ATCs were created using packing tape as a transfer method. I used images that I found in magazines and then colored the back of the transfer with Powder Pearls and attached the transfer to the cards using gel medium. Each ATC has a bit of a different background method. (Instructions on this technique can be found on my next post).

Designer Robin Knutson's piece can be viewed by visiting her blog (click here). Jeni Calkin's ATCs can also be viewed on her blog (link is on the right). This was a fun challenge and we welcome our readers to share their pieces. Please leave a comment linking back to us from your blog, website, or picture trail site to share with the rest of us. Until the next time.... Lori Roberts, Senior Designer of Altered Arts Magazine