Thursday, January 17, 2008


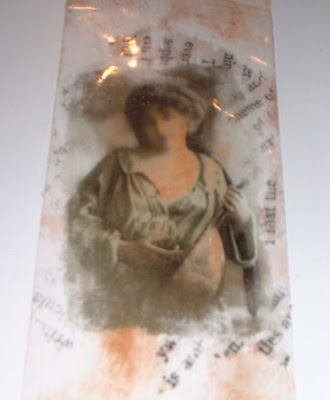
You now have this beautiful transparent image to use. There are now several ways that you can treat this image.


The back of the image will be sticky and my favorite thing to do is to apply some pigment powders to it. Pearl Ex or Powder Pearls can be brushed on or you can use a gold leaf pen, apply sheets of gold leaf, chalks, paints, glitter, glitter glue or anything that you like (did I leave anything out??? :). One other thing to try is to cut your image out before you apply it to the tape (use decorative scissors or tear your image) and then after you have placed your image on the sticky side of the tape, place different papers around your image (also on the sticky side of the tape) like newspaper print, print from a magazine, and other images like flowers to make a collage on the tape and you will end up with this gorgeous piece of artwork. Leave little gaps in the papers and then fill them with the powders, glitter or gold leaf for an interesting effect.

TA DA!!!!!!

Your image is now ready to use!

There are several ways to attach your image to your artwork. I like to use gel medium but you can certainly use a glue stick or double sided tape.

Here are some tips to remember when you are doing this technique:

1.) Make sure the surface that you are working on is free of any tiny particles (especially those tiny little holeless beads; these could leave lumps, bumps or grooves in your tape).

2.) Use a pair of decorative scissors to cut your image out.

3.) If your image is wider than your tape, you can place pieces of tape next to one another (so long as it overlaps a tiny bit). This seam will not show too much and will give it some depth and texture.

4.) If you get a wrinkle in your tape that is fine...burnish it well, that tiny line will not show too much.

Okay, you now know how to do it and we would LOVE to see your end results! Please post to the comments section with a link to your site, blog, or picture trail site and share your creation with us!

Wednesday, January 16, 2008

Results of Designers' ATC Challenge

Well ,below are my pieces for the designers' challenge I had previously posted information about. These ATCs were created using packing tape as a transfer method. I used images that I found in magazines and then colored the back of the transfer with Powder Pearls and attached the transfer to the cards using gel medium. Each ATC has a bit of a different background method. (Instructions on this technique can be found on my next post).

Designer Robin Knutson's piece can be viewed by visiting her blog (click here). Jeni Calkin's ATCs can also be viewed on her blog (link is on the right). This was a fun challenge and we welcome our readers to share their pieces. Please leave a comment linking back to us from your blog, website, or picture trail site to share with the rest of us. Until the next time.... Lori Roberts, Senior Designer of Altered Arts Magazine


Thursday, December 6, 2007

What does the workspace of a Mixed Media Artist look like?


Well I can tell you that it is not a pretty picture as you can see for yourself. Since my move out west, the space has become much smaller and there's no where to put anything. Not to mention that I share my room with one of the family pets - - our cat whose name is "269". Long story but she came with the house when my daughter bought it and since my daughter manages one of the veterinary clinics here, well what could she do? :) I really don't mind because she is sweet and loves to curl up and purr! What I do mind is that she does not help cleaning up the mess that I make! I will get a picture of her and post it.

Well here you see my creative contraption of cubby holes a.k.a. a shoe rack! My daughter was going to throw it away but I had a better idea!

Wednesday, December 5, 2007

More of My Space

Here is my stack of shelves! My daughter was going to throw them out also...I wasn't sure what they were shelves for - - a TV? Nope - - shelves for a microwave. Okay, why not... I piled them up and use them to house some of the 100's (or could that be 1000's??) of rubber stamps that I own. NO they are not all there! HA HA! I have 3 huge totes full sitting in the garage.

And yes that is a jar of instant coffee on the lower right side. No 269 and I don't drink that...we use it in our art.

There are more shelves but it was way too messy to show.

Tuesday, December 4, 2007

Saved the worse for last!


OK, so here is where all the creation begins on my desk (table, work area, studio). You can pick one of those words as it might fit in. And yes this was also recycled. My mother had this table on her patio and no longer needed it. Could you say that my "work space" is a form of altered arts? I took things that were meant for one thing and used them for something else. OK I am stretching it a bit but it sounds good.

I am a messy artist. I have to admit that. Right now, believe it or not, I just sort of cleaned it to take this picture. Well, sort of pushed things back to make it look like I have a spot to create in. But I am one of those people that if my work space is clean I freak right out! I like a mess when I am creating. Call me crazy but it helps me. I keep piling up the supplies, tools, inks, pictures, glue etc., etc. and the space will get smaller and smaller and then I can't find a thing...did you notice that there are 2 bottles of my glitter glue in the same colors? Did I get them on sale? NOPE! I usually buy 2 of everything because I loose it on my desk! LOL!

Well I have come out of my comfort zone and have showed the world "my space!" How about you share your creative work space?